How to Build a Shopify Store in 10 Easy Steps
Learn how to build a Shopify store in 10 simple steps, from setup and customization to launching, marketing, and optimizing with tools like ReelTok and Shoppable videos.
Building an online store can seem like a daunting task, but Shopify makes the process simple and accessible for everyone—whether you’re a small business owner, an entrepreneur, or simply exploring eCommerce for the first time. Shopify is one of the most popular eCommerce platforms in the world, providing everything you need to start selling products online without needing coding knowledge.
In this article, we’ll walk you through how to build a Shopify store in 10 easy steps. By the end, you’ll have a fully functional store that’s ready to start generating sales!
1. Why Choose Shopify for Your eCommerce Business?
1.1. Key Benefits of Shopify
Shopify is designed to be user-friendly and scalable, offering solutions for both small businesses and larger enterprises. Some of the key benefits of choosing Shopify include:
User-friendly interface: Even beginners with no technical background can create and manage their store easily.
Scalability: Shopify can grow with your business, whether you're starting small or managing thousands of products.
All-in-one solution: Shopify includes built-in payment processing, shipping solutions, and SEO tools to help optimize your store for search engines.
Extensive app marketplace: Shopify has an app store with thousands of integrations, from email marketing tools to apps like ReelTok, which allows you to integrate Shoppable videos for a more engaging customer experience.
1.2. Examples of Successful Shopify Stores
Brands like Gymshark, Allbirds, and Kylie Cosmetics are just a few examples of businesses that have found success using Shopify. These companies are proof that Shopify can support businesses of all sizes and industries.
2. Step 1: Sign Up for Shopify
2.1. Creating Your Shopify Account
To begin building your Shopify store, head to Shopify’s website and click on "Start Free Trial." Shopify offers a 14-day trial period to explore the platform without any commitment. During the sign-up process, you’ll need to enter your email, create a password, and choose a store name.
Tip: Choose a store name that reflects your brand. If the exact domain is unavailable, Shopify offers domain suggestions.
2.2. Set Up Your Store Name
Your store name is an important aspect of your branding. Shopify allows you to customize your domain (e.g., www.mystore.com). You can either purchase a new domain directly from Shopify or connect an existing domain.

3. Step 2: Customize Your Store Theme
3.1. Choose a Shopify Theme
Once you've signed up, it’s time to give your store a professional look. Shopify offers both free and premium themes that cater to various industries and design preferences. Go to the “Themes” section in your Shopify dashboard and browse through the options available.
Tip: Free themes like "Debut" and "Brooklyn" are great starting points. Premium themes offer more advanced features and customization.
3.2. Customizing Your Theme
Shopify's drag-and-drop editor makes it easy to modify your theme without coding. You can change the colors, fonts, and layout to match your brand identity. Add your logo, tweak the header, and adjust the placement of sections like the product gallery.
Add banners and images: Use high-quality visuals that showcase your products.
Personalize your store: Tailor the fonts and colors to fit your branding.
3.3. Mobile Optimization
Mobile eCommerce is growing, so it’s crucial that your Shopify store is optimized for mobile devices. Most Shopify themes are responsive, meaning they automatically adjust to different screen sizes. Before launching, preview how your store looks on mobile to ensure everything works smoothly.
4. Step 3: Set Up Essential Shopify Settings
4.1. General Settings
Your Shopify store’s settings need to be configured correctly to operate smoothly. Navigate to the “Settings” section of your dashboard and adjust the following:
Store details: Add your business address, email, and legal information.
Currency and timezone: Set your preferred currency and timezone for transactions.
4.2. Payment Settings
Shopify supports a wide range of payment gateways, including Shopify Payments, PayPal, and Stripe. Setting up payments is crucial to allowing customers to make purchases. Go to “Payments” in your settings and select the payment methods you want to offer.
Tip: Shopify Payments is recommended as it integrates seamlessly and avoids extra transaction fees.
4.3. Shipping Settings
Next, configure your shipping options. Shopify allows you to set flat rates, real-time carrier shipping, or offer free shipping. Make sure your shipping settings align with your business strategy.

5. Step 4: Add Your Products
5.1. Product Listing Basics
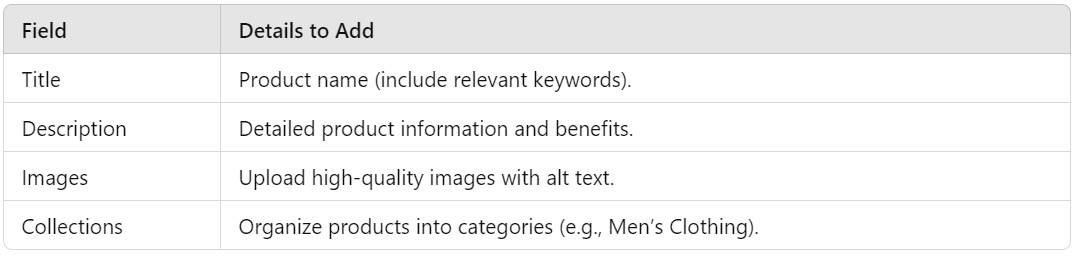
Adding products is one of the most crucial steps when learning how to build a Shopify store. In the “Products” section of your Shopify admin, click “Add product.” Fill out the required fields like:
Title: Clear and concise product names.
Description: Use compelling copy that describes the product and its benefits.
Price: Set your price, and include any discount offers.
SKU and inventory management: Keep track of your stock levels.
5.2. Upload Product Images
Visuals play a key role in converting browsers into buyers. Upload high-quality images for each product and include multiple views. Use the alt text field to describe your images, which helps with SEO.
5.3. Organize Products into Collections
To make navigation easier for customers, create collections (categories) such as “New Arrivals” or “Best Sellers.” Collections help group related products, making it easier for customers to browse.
6. Step 5: Set Up Pages and Navigation
6.1. Creating Key Pages
Your Shopify store should include essential pages to build trust with customers. Some of these pages include:
About Us: Tell your brand story.
Contact Us: Provide an easy way for customers to get in touch.
Shipping & Return Policy: Clearly explain your shipping rates and return policies.
Privacy Policy and Terms of Service: Include legal pages to comply with regulations.
6.2. Organize Your Store’s Navigation
To create a seamless shopping experience, organize your store’s navigation menus. Add links to important collections, pages, and the shopping cart. Make sure the navigation is intuitive and easy to follow.
7. Step 6: Install Shopify Apps
7.1. Explore the Shopify App Store
One of the great features of Shopify is its app marketplace. Apps can help you enhance your store's functionality in areas like marketing, customer service, and shipping. To get started, visit the Shopify App Store and search for apps relevant to your business needs.
7.2. Must-Have Shopify Apps
Here are some essential apps to consider:
ReelTok: Use this app to integrate Shoppable videos directly into your product pages. This interactive feature allows customers to purchase products by clicking on items shown in the video, boosting engagement and conversions.
Email marketing apps: Apps like MailChimp and Klaviyo can help you grow your email list and automate marketing campaigns.
Review and rating apps: Build trust by showcasing customer reviews and ratings.
Pro Tip: Shoppable videos created with ReelTok can increase customer engagement, as they allow users to make purchases while watching videos, providing a dynamic and seamless shopping experience.
8. Step 7: Set Up Domain and Launch Your Store
8.1. Buy a Domain
Once your store is ready, you’ll want to set up a custom domain. You can buy a domain through Shopify, or connect an existing domain that you own. A custom domain helps establish your brand and makes your store easier to find.
8.2. Preview and Test Your Store
Before launching your store, it’s important to test everything thoroughly. Check how your store looks on both desktop and mobile, and ensure all the links, buttons, and checkout process work smoothly.
Tip: Ask friends or colleagues to test your store and provide feedback before going live.
8.3. Launch Your Shopify Store
Once you’re confident everything is set up properly, it’s time to make your store live! Announce your store launch through social media, email marketing, and other channels to start driving traffic.

9. Step 8: Set Up Shopify Analytics
9.1. Enable Shopify Analytics
Tracking your store's performance is crucial for growth. Shopify has built-in analytics that allows you to track key metrics like sales, traffic, and customer behavior. To access these insights, navigate to the “Analytics” section in your dashboard.
9.2. Monitor Key Metrics
Some of the key metrics to track include:
Traffic: How many visitors come to your store.
Conversion rate: Percentage of visitors who make a purchase.
Top products: Identify best-selling items and optimize your marketing efforts around them.
Integrating Google Analytics with Shopify gives you even more in-depth insights into your customers’ behavior.
10. Step 9: Marketing Your Shopify Store
10.1. SEO Optimization
Optimizing your Shopify store for search engines is a crucial step in attracting organic traffic. Focus on optimizing your product titles, meta descriptions, and alt text with relevant keywords. Blogging and content marketing can further enhance your SEO efforts.
10.2. Social Media and Paid Advertising
Leverage social media platforms like Instagram, Facebook, and Pinterest to promote your products. You can also use paid advertising to target specific audiences.
10.3. Email Marketing
Email marketing remains one of the most effective ways to convert leads into customers. Use tools like MailChimp or Klaviyo to create email campaigns, send promotions, and offer discounts to your email list.
Pro Tip: Use Shoppable videos in your email campaigns and social media posts to offer an engaging and interactive shopping experience.
11. Step 10: Offer Customer Support and Build Trust
11.1. Set Up Customer Support Channels
Providing excellent customer service is key to retaining customers and building trust. Install live chat apps or chatbot services to assist customers in real-time.
11.2. Build Trust Through Reviews and Testimonials
Encourage customers to leave reviews after a purchase. Positive feedback and social proof can increase conversions and trust in your brand.
Tip: Use the ReelTok app to create Shoppable videos showcasing customer testimonials. This can add authenticity to your products and build credibility.
12. Conclusion
Congratulations! You’ve completed the guide on how to build a Shopify store in 10 easy steps. By following these instructions, you’ve set up a fully functional online store, complete with products, a customized theme, and essential tools like the ReelTok app for integrating Shoppable videos. Remember, the journey doesn’t stop here—continue optimizing your store, tracking your performance, and building a loyal customer base.
Your Shopify store is now ready to bring your eCommerce dreams to life!
Related articles
More from Shopify Platform
Shopify Pricing Guide: Best Plan for Your Store
Discover Shopify plans and pricing in this comprehensive guide. Learn which plan best suits your store's needs, from Lite to Plus, and grow your business.

Best Shopify Apps for Marketing & Sales Growth
Discover the best Shopify apps for marketing and sales growth. Boost conversions and optimize your store with top tools like Klaviyo, ReelTok, and more!
Why You Should Use Shopify Image Resizer
Learn why Shopify Image Resizer is essential for optimizing your store's images. Improve site speed, SEO, and user experience with this free tool.